Quickly Deploy ClickHouse Docker Server
Clickhouse is a column-oriented database created by Yandex and open sourced, which supports real-time SQL queries for Online Analytic Processing.
It is designed from the ground up to support billions of rows and terabytes of data, but still return results to analytical queries in hundreds of milliseconds, even on fairly normal and commodity server hardware.
ClickHouse is quite commonly used in website analytics services, were you stream ingest events into a long-term data warehouse, but have the ability to quickly query data at a later point, to perhaps graph unique visitors, browser adoption, page performance etc.
Getting started is really simple, especially with Docker which is what we'll go through in this guide.
1 - Setup Storage
Clickhouse persists it's data to a physical disk, so while you can just run the docker image as is, it makes sense to define a permanent storage location for your data.
Here we create a folder to contain the docker files "clickhouse" within our home directory, and within that we create another folder called "dbfiles" which will simply contain the stored data - You can change these to match your preferred partitioning layout.
cd ~
mkdir clickhouse
cd clickhouse
mkdir dbfiles
2 - Create Docker Compose FIle
Next we need to create a Docker Compose file, simply put this is a file that will tell docker what image we want to run, where we want the data to be stored, and how we want the networking to be setup - This will go in our newly created folder, so just open the file up in a text editor like nano.
nano ~/clickhouse/docker-compose.yml
Then paste in the following, making any changes you need (if you changed the folder names in step one then you must reflect that here).
version: '3'

services:
  click_server:
    image: yandex/clickhouse-server
    ports:
      - "8123:8123"
    volumes:
      - ./dbfiles:/var/lib/clickhouse

  click_client:
    image: yandex/clickhouse-client
    entrypoint:
      - /bin/sleep
    command:
      - infinity
3 - Start and Connect to Clickhouse
Next we simply need to tell Docker that we want to run our compose file, that's just a case of running docker compose, with the up command.
sudo docker-compose up -d
If this is the first time running a Clickhouse server on this host you'll see it start to download the image files from the internet, which could take a few minuets - Once that's done you can connect to the Clickhouse server using the command:
# docker-compose exec click_server clickhouse-client

  ClickHouse client version 21.8.10.19 (official build).
  Connecting to localhost:9000 as user default.
  Connected to ClickHouse server version 21.8.10 revision 54449.
  66c76cb18f7b :)
4 - Create a Database and Test
Below are some examples of how we can create a database, tables, insert data and perform some basic selects - If you've ever used MySQL or another SQL based database before, this will all look very familiar.
Create and Use a Clickhouse Database
Just as you would in any other SQL database, there isn't anything special to consider when creating a Clickhouse database - Simply use the "create" command to generate a new database, and "use" to select a database.
66c76cb18f7b :) create database pingbin;

CREATE DATABASE pingbin

Query id: b648f3a8-ccf4-43a0-8e25-da881ce9196b

Ok.

0 rows in set. Elapsed: 0.025 sec.

66c76cb18f7b :) use pingbin
Create a Clickhouse Table
Again creating a new Clickhouse Table is fairly simple, and very similar to how you create any other SQL database table - One thing you should pay attention to is to how you partition and order your data, here we use the date, as each day is granular enough to allow good partitioning, and the order is going to be on all of our queries.
CREATE TABLE visits (
 Id UUID,
 EventDate DateTime,
 DomainId UUID,
 Path String,
 Referrer String,
 OperatingSystem String,
 OperatingSystemVersion String,
 CountryCode String,
 Browser String,
 BrowserVersion String,
 ScreenWidth UInt16,
 ScreenHeight UInt16
)
ENGINE = MergeTree()
PARTITION BY toYYYYMMDD(EventDate)
ORDER BY (EventDate);
Insert and Select from a Clickhouse Table
Finally we will insert an example row, again this is extremely similar to any other SQL database, just ensure the order of your data matches the column order.
INSERT INTO visits VALUES (
    'd9c544bd-ec6c-4b58-b34d-b24cb51c0904',
    '2021-02-03 00:01:01',
    'd9c544bd-ec6c-4b58-b34d-b24cb51c0911',
    '/domains',
    '',
    'Windows',
    'Windows 10.101.1',
    'GB',
    'Chrome',
    'Chrome 123',
    1200,
    600
);
Then here we select that row back out of the database.
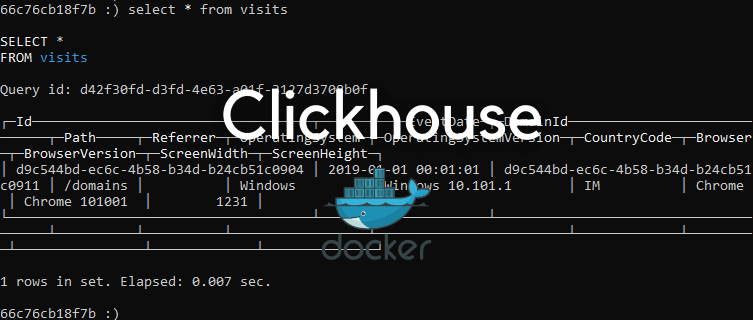
66c76cb18f7b :) select * from visits

SELECT *
FROM visits

Query id: 74a724a1-8b33-4130-8c26-fcb0bdc9f0c3

? d9c544bd-ec6c-4b58-b34d-b24cb51c0904 ? 2019-01-01 00:01:01 ? d9c544bd-ec6c-4b58-b34d-b24cb51c0911 ? /domains ?          ? Windows         ? Windows 10.101.1       ? IM          ? Chrome  ? Chrome 101001  ?        1231 ?          500 ?

1 rows in set. Elapsed: 0.012 sec.
Hopefully that was helpful, we've tested the above process on both Windows and Linux (Ubuntu) so it should work fine for you, however if you have any queries or issues just let us know and we'll try to help out.
One thing to mention is that you probably want a minimum of 4GB RAM free to run Clickhouse, and enough storage space to obviously hold the data that you plan to load into it, however it does compress the data quite well in comparison to other databases.